Please change your password the first time you use MIRS.
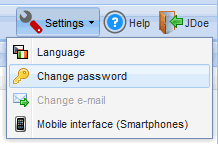
To change your password click "Settings" in the upper right hand corner and select "Change Password".
MIRS - Marysville Information Retrieval System
Important! MIRS should never be used for documents that have private, sensitive, or protected data.
Please note: Content searching is currently limited with this tool and employees with a need may request an R: Drive capable of searching
 |
If you need access, you will need your supervisor's approval, then please
contact the Clerk's Office or I.S. to have a login setup. Please change your password the first time you use MIRS. To change your password click "Settings" in the upper right hand corner and select "Change Password". |
 |
If your Department has a
Departmental folder, you will have permission to upload documents into
the folder. The "Public Records" folders are managed my the
Clerk's office and will always be read only. To add a departmental
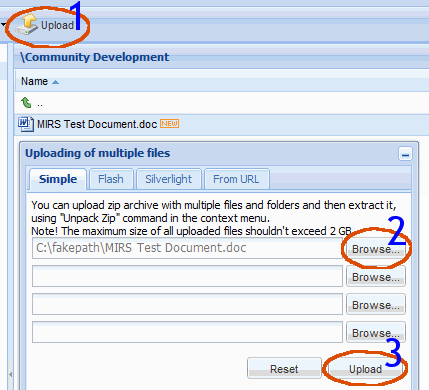
folder, please contact the Clerk's Office or I.S.. To upload a document: 1) Click "Upload" found in the upper left corner which will open an upload dialog box. 2) There are four different options for uploading, the default is "Simple". Click the "Browse" button which opens a Windows Explorer dialog box. Navigate to the file you want to upload and click the "Open" button. 3) Click the "Upload" button. |
Creating Public Download Links
 |
Any user, even a user that has no
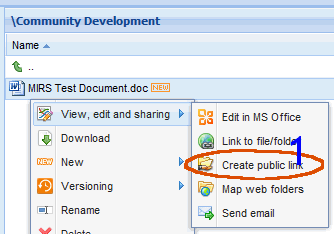
account in MIRS, may download files via a public link. To create a "Public Link": 1) Right click the document of folder you wish to link to. Then select "Create Public Link". |
 |
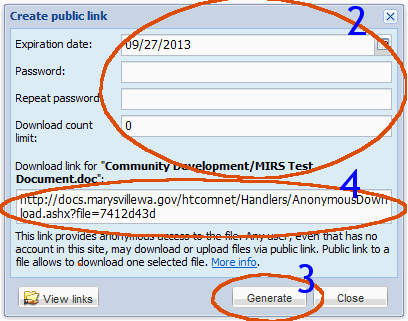
2) Set the date you want the
link to expire. The default is one year. A download count
limit may be set. The default is 0 which means unlimited in geek speak.
A password is optional. 3) Click the "Generate" button. 4 Copy and paste the generated link into an email to send to the desired person. |
If you want to allow someone from outside of the City to
upload a document to MIRS, here are some instructions on how to set up a Public
Upload Link. If the outside person will be uploading many documents over an
extended period of time, you may contact the Clerk’s office or IS and we will
create a user login for your “uploader”.
First create a folder that you want to contain your public
uploads.
Then right click the folder and select ‘View, edit and sharing’ | ‘Create public
link’
In the Create public link dialog box you may change the
expiration date of the link or add a password.
You may also uncheck ‘Download files’ if you only want to allow the person to
upload
Then click the generate button.
Copy the generated link and send it to the person you want to have the upload
permissions.
Sample Email ---------------------------------------------------------------------------------------------------------------------------
Hello,
Here is a link to take you to our file manager server that will allow you to upload the document.
(Insert your generated link here)
Simply click ‘Upload files to this folder’
Select ‘Browse…’ and browse to the document you wish to upload.
Click ‘Upload’ and your done!
Searching
Please note: Content searching is currently limited with this tool and employees with a need may request an R: Drive capable of searching